Kimchi Fried Rice 김치 볶음밥

One of my very favorite Korean comfort foods, especially in the winter, is kimchi bokkeumbap or kimchi fried rice.

Kimchi bokkeumbap is not the HEALTHIEST of all recipes, but it certain isn´t the worst. Plus, cooking makes me happy and it´s something I rarely do here in Korea where eating out is fairly healthy and low cost (bibimbap for 5 dollars, galbi for about 8 dollars..) and I have so little time with such a busy work schedule. I seriously can´t remember the last time I cooked so little.

So, the other day, I tried my hand at kimchi bokkeumbap.

Turned out nicely! When I made it, I didn´t have carrot, and it would also be tasty with ground pork, so I´m going to include that in the recipe anyway, but know that it would be no problem to nix the pork. Another nice additions might be green or red pepper, spam, chicken, and maybe even sesame seeds.

Grace´s Kimchi Bokkeumbap

INGREDIENTS:

2-3 cups leftover cooked rice (white, brown, or a mix is nice)

1/2 cup of chopped green onion

1 cup ground pork (optional)

1 cup finely diced carrot

1/2 a white onion, chopped

gochujang (korean red pepper paste)

1/2 cup of chopped kimchi

1 egg per person eating

kim (seasoned dried seaweed. Torn Nori might work alright as a substitute)

1/2 tablespoon of butter

1 tablespoon of sugar

1 tablespoon of vegetable oil (or canola, or sunflower)

1-3 tablespoons of soy sauce

DIRECTIONS:

Sautee the onion, carrot, green onion, and ground pork in a work or deep skillet with butter. If you use pork, brown the pork first, then add the carrots and onions, and green onion last. Remove from the skillet.

Add the left over rice  and a little bit of oil. Sautee until the rice softens. Add the vegetables back in.

Mix in 1-2 tablespoons of gochujang and  the soy sauce and the sugar.

Add in the kimchi and a little of the kimchi juice. You don´t want the rice wet though, so just a pinch.

Finally, add a few pinches of kim. Make sure everything is mixed in well.

Fry a egg sunny side up and serve on top with an extra pinch of kim laver for decoration.

DSCN2902

DSCN2898

DSCN2903

Bibimbap 비빔밥

Bibimbap 비빔밥 (bibim=mixed bap=rice) has become a very trendy Korean food here in the States and rightly so. It is delicious.

While in Korea, I ate bibimbap on the daily and was happy as a clam.

DSCN2163

Interestingly, Koreans are not so impressed by this dish as foreigners are. It´s sort of their leftovers dish where they mix in all the extra banchan (side dishes) with rice and throw an egg on it. My students thought bibimbap was OK but most Koreans think of ¨good¨ food as including grilled meat, like galbi.

Bibimbap is great because it has a lot of room for creativity. You can pretty much add any vegetable topping you want. In the states we have gotten creative and make hippy bibimbap with quinoa, kale, etc.

There are two main types of bibimbap; Dolsot bibimbap 돌솥 비빔밥 and regular bibimbap.

Dolsot bibimbap is made in a hot stone bowl and served with a runny or raw egg which cooks when you mix it in the hot bowl.

Korean_cuisine-Bibimbap-08

Regular bibimbap is served cold is a stainless steel bowl. Sometimes the egg is sunny side up, and sometimes it´s cooked into thin strips. Cold bibimbap sometimes has lettuce, too.

There is also bibimbap made with raw beef and a raw egg yolk called yuk hoe bibimbap 육회비빔밥.

I’ve never tried it and am sad I didn’t get the chance.

BIBIMBAP

Eat Your Kimchi does a great video on fancy bibimbap for can check out: http://www.eatyourkimchi.com/the-best-bibimbap-in-korea/

There other day I made some bibimbap that rivaled the versions I ate in Korea. I thought I would share the magic.

The key to good bibimbap is the gochujang 고추장. Gochujang means red pepper paste but it is also the name for the sauce on bibimbap. Red pepper paste is used in everything in Korea. It´s almost a bigger staple than kimchi (Kimchi has red pepper in it).

I bought some gochujang at Uwajimaya just for the occasion.

Unknown

Here´s the recipe for the bibimbap sauce:

Bibimbap Sauce

2 Tbsp red pepper paste

1 Tbsp sesame oil

1 Tbsp sugar

1 Tbsp water

1 tsp apple cider vinegar (any vinegar is fine)

1 tsp minced garlic

Bibimbap

Ingredients: 

2 carrots

1 zuchinni

4 shitake mushrooms (crimini is okay too)

1 head of spinach (I prefer the head to the pre-packaged)

1 cucumber

garlic

sesame oil

toasted sesame seeds

gochujang

sugar

rice vinegar

2 cups white or long grain brown rice

Apple cider vinegar

Optional:

mirin

kimchi

dried seaweed (gim, nori)

Directions: 

Start the rice.

For each ingredient, you must cook it separately. I used my cast iron for this which I think enhances the flavor.

Carrots:

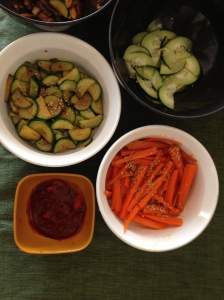
Cut into matchsticks. Stir fry with sesame oil and salt. Sprinkle with toasted sesame seeds. Set aside.

Zucchini:

Cut the zucchini lengthwise and then thinly slice to create half moons. Sauté with sesame oil, a dash of soy, and sprinkle with toasted sesame seeds. Set aside.

Cucumber:

Slice paper thin. Put into a bowl with 2 tablespoons rice vinegar and a pinch of salt and a pinch of sugar. Sprinkle with toasted sesame seeds. Set Aside.

Shitake Mushrooms: 

Cut very thin. Cook in sesame oil with a tablespoon of mirin and a dash of soy. Set aside

Spinach: 

Wash then leaves and cut off the stems. Cook it a double boiled until it starts to wilt. Squeeze out all the water and smuch it into a ball. Put the ball in a small bowl and drizzle with sesame oil, soy sauce, and sprinkle toasted  sesame seed son top. Thinly chop the spinach before serving.

Here´s what my side dishes looked like:

IMG_2444IMG_2445

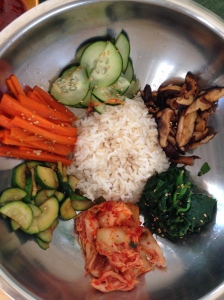
Last step is fun. Scoop up the rice with a cup measure and place in the center of the bowl. Arrange ingredients in the bowl.

Sometimes bibimbap is served with the egg in the middle and the side dishes around it and the rice is served on the side. Othertimes, the rice is already in the bowl underneath. Your call!

Fry an egg sunny side up and place on top.

Top it off with nori strips, gochujang, and kimchi.

IMG_2448 IMG_2453 IMG_2458 IMG_2457

There are many other awesome side dishes I didn´t include in this recipe.

The one above is vegetarian but you can of course make it with ground beef. Below are some additional toppings/side dishes that would be awesome in your bibimbap.

Minced Beef: 

Marinate in soy, sesame oil, sugar and minced garlic. Sauté until brown.

Marinated Tofu:

Cut into long cubes. Marinate in soy an sesame oil. Fry in vegetable oil.

Bean Sprouts:

A very traditional bibimbap addition. Boil mung beans for two minutes. Drain and top with sesame oil and scallions.

Boiled gosari*, 고사리 (fernbrake):

This is a side dish common in korea made from ferns, or bracken. You simply boil it or dehydrate it. Read more here.

Unknown-1

Most Korean markets should have it.

Empanadas Chilenas

Empanadas are the Chilean meal on the go. I eat at least one or two a week when I’m out all day teaching. My favorite kinds are the camaron y queso (shrimp and cheese), caprese (tomato, basil, cheese) and pino (ground beef with a hard-boiled egg, olives, and raisins). They are also popular in many other countries in South American and vary slightly from region to region.

I decided to make two types; empanadas de pino and a cheese, tomato and spinach filling.

Empanadas de Pino Filling

1/2-1lb ground beef

1 white onion, finely diced

2 cloves of garlic, minced

i cup of beef broth (optional)

1 tablespoon of cumin

1 teaspoon paprika/cayenne

1 tablespoon of sugar

1 tablespoon of butter

1 tablespoon of olive oil

salt

black pepper

2-4 hard-boiled eggs, sliced

pitted black olives

1/2 cup of raisins

To make the filling you have to first remember to hard boil the eggs and put them in cold water while you cook the beef.

To begin the filling, add the onions and garlic with the butter and olive oil and saute until translucent. Next, add the beef and spices and stir until browned. Finally, add the beef broth and raisins and sugar and let it simmer for about 20 minutes until fragrant and set aside. When you make the actual empanadas, you will put beef, a hard-boiled egg slice, and one olive in the center.

Now, the tricky part. The dough. I found this recipe on Laylita’s fabulous South American food blog and adapted it. The dough turned out great. Buttery, flaky, delicious.

Empanada Dough (For Baking)

3 cups all-purpose flour

1/4 teaspoon of salt

6 oz unsalted butter

1 egg

4-5 tablespoons of water

Directions:

Mix the flour and salt together in a big mixing bowl  (or food processor) until blended. Next add the water, egg, and butter, a little at a time, and mix thoroughly until it starts to form clumps.

Form the dough into a ball and stick it in the fridge for 30 minutes.

When your ready to make the empanadas, roll the dough out onto a flat, hard surface sprinkled with flour. You can then decide whether you want to cut out big circles, little circles, whatever you like!

Now for the folding. You’ve got your fillings ready to go, and the dough is ready and in circles. At this point, it’s up to you to decide what type of fold you want to do. Traditionally, there are certain folds for certain types of empanadas. For example, empanadas de pino are typical in a square shape, empanadas de queso are in a rectangle type shape, and usually empanadas de camaron(shrimp) ate the typical half-moon, but it all depends on the restaurant. I did my best, but in all honesty, I could use some serious folding practice. Mine were not exactly gorgeous. But, there are lots of online resources for learning different folds, and even cool little gadgets that make it a breeze!

Oddly enough, one of my favorite empanada fold guides is from an empanada vendor in Seattle called Pampeana Empanadas. I actually did a story on this company around when they first opened last summer. The site has a great little empanada fold guide which I love.  Check it out!

After awkwardly trying to fold my empanadas (square for pino, half-moon for the cheese/tomato/spinach), I make sure to lightly brush the tops of the empanadas with an egg yolk mix (egg yolk, teaspoon of milk) so that they had that pretty golden brown color. I baked them for 25 minutes at 400 degrees.

DSC_1229

Que rico! (despite the ugly folding)

Tom Kha Gai

Student teaching has ended and I am on my way to being a gainfully employed teacher. I miss my students very much but the last quarter of school means more free time and I am not complaining. Let the cooking commence!

I had a hankering for this classic Thai dish for a while and seemed perfect on a rainy spring afternoon. I order it often at restaurants but had never made it at home. Turns out its super easy and my recipe came pretty dang close to restaurant good. Best part was it took 20 minutes!

I adapted the recipe from this fabulous version.

IMG_2195

Tom Kha Gai: Chicken Coconut Milk Soup with Lemongrass 

Ingredients:

  • 3 cups (24 fluid ounces) chicken stock (In a squeeze bouillion is okay..)
  • 1 lb boneless, skinless chicken breasts, cut into bite size pieces across the grain
  • 3-4 heads of baby bok choy
  • ½ lb (8ounces) fresh or canned straw mushrooms (drained) (crimini or oyster mushrooms work too!)
  • 1 stalk lemongrass
  • 5-6 fresh bird’s eye chilies (more or less depending on your heat preference) (I used 1 thai chili for this recipe)
  • 2-inch piece of fresh galangal, sliced thinly crosswise (Fresh ginger works too!)
  • 4-5 fresh kaffir lime leaves (Use lime zest as a substitute)
  • 4-5 limes
  • ¼ cup fish sauce (but have more ready)
  • ½ cup fresh cilantro leaves
  • 1½ cups (12 fluid ounces) full-fat coconut milk
  • Nam Prik Pao (Thai chili jam) (Optional! I used Vietnamese chili paste instead)
  • ½ cup thai basil leaves, chopped
  • 2-3 cups of cooked jasmine rice

Instructions:

  1. If making rice, start cooking it in a pot or rice cooker.
  2. Put the chicken stock in a wide and shallow saucepan (to ensure fast evaporation), bring it to a boil, and reduce it over medium-high heat.
  3. Halve (or quarter) the mushrooms into bite-sized pieces; set aside.
  4. Cut the lemongrass stalk into 1-inch pieces and smash them with the side of a large Chinese cleaver, a pestle, or any heavy object lying around in the house; set aside.
  5. Do to the chilies what you just did to the lemongrass; set aside.
  6. Remove the stems and the tough veins that run through the middle from the kaffir lime leaves, and tear them up into small pieces. You can also bruise them a little. Set aside.
  7. If using lime juice, instead of kaffir lime leaves, zest now and set aside. Juice 2 limes; set aside. (You may need more; you may not. It’s better to have more than you need than not enough.)
  8. Put the coconut milk into a 4-quart pot, followed by concentrated chicken stock, kaffir lime leaves (or lime zest), lemongrass pieces, and galangal (or ginger) slices.
  9. Bring the mixture slowly to slightly below a simmer, allowing the herbs to infuse the liquid for about a minute.
  10. Keeping the temperature steady, add the mushrooms and the chicken to the liquid; adjust the heat to maintain the temperature. The liquid should never at any point come to a rapid boil. Don’t worry; at 160°-180°F, your chicken will be thoroughly cooked.
  11. Stir gently to ensure that the chicken is evenly cooked. (If you want more liquid, add more plain water or unconcentrated broth.
  12. Once the chicken is cooked through, throw in the smashed chilies and remove the pot from heat immediately.
  13. Add the chopped bok choy
  14. Add the juice of 2 limes and the fish sauce to the pot, stir, and taste. Add more lime juice and fish sauce, if necessary. The soup should be predominantly sour, followed by salty. The sweetness comes from natural sugar in the coconut milk.
  15. Stir in some of the cilantro leaves and serve your tom kha gai with steamed jasmine rice as an entree.
  16. Offer basil, cilantro, lime wedges and Nam Prik Pao (or chili sauce) as a garnish.

Vietnamese Vermicelli (Bún Thit) Bowl

I seem to be on a big Vietnamese food kick as of late. It´s been so hot and the only things that sounds good to eat are fruit, grilled meat, and fresh herbs.

When I visited Hanoi last September, one of the most popular dishes was Bún Cha, which is fatty grilled pork served with bún (vermicelli rice noodles) served with sweet and vinegary dipping sauces and fresh herbs. It was crazy good and very addicting. I can thank my friends Tali and Nate for showing me the light.

DSCN1388 DSCN1390 DSCN1464

DSCN1389


Most western Vietnamese restaurants serve southern style Vietnamese food and this dish is called Bún thịt on most menus. The difference between bún thit and bún cha is it is more like a composed salad and is most typically served with charcoal grilled pork neck. It is dressed with nuoc cham (fish sauce) and sometimes topped with pickled carrots, peanuts, and/or  sliced egg rolls.

I attempted to make the more southern version of this dish (bún thit) and thought it came out well. I used grilled steak instead of pork neck  or pork shoulder because it was hard to find, but I´m sure it would be delicious and is certainly more traditional.

Vietnamese Vermicelli Steak Bowl

1 8oz steak

vermecilli noodles (bún)

lettuce, cut in ribbons

2 carrots, julienned (Julienne is optional. You could also shave the carrot, or just chop thinly.)

1 cucumber, julienned (Again, optional. I used a mandolin.)

basil (Thai basil is best)

cilantro

mint

salted peanuts (chopped)

1 tablespoon soy sauce

1 tablespoon vegetable oil

Nuoc Cham (Fish Sauce)

4 tablespoons white vinegar

3 tablespoons of fish sauce

3 tablespoons lime juice

3 garlic cloves, minced (use a mortar and pestal if available)

2 thai chilis, cliced thinly

1 tablespoon honey

bashed spring onion

1 tablespoon white sugar

DIRECTIONS

In a small pot, combine the sugar, fish sauce, honey, lime juice, white vinegar. Bring to a boil, then turn off the heat. Mix until the sugar has dissolved. Add the bashed spring onion and garlic.

Coat the steak well  with a few spoonfuls of sauce, a little water, and a tablespoon of soy sauce, then enclose the flavours with the vegetable oil. Let the mixture marinate in the refrigerator for 2 hours or overnight, for a better result.If there´s no time for marinade, no worries. Just put the steak in the fridge until grilling time. This would apply to pork shoulder as well.

Preheat a grill on medium to high heat. Put the steak on and char grill on medium to high heat for 4-6 minutes on each side.I like it charred on the outside and pink in the middle, but you can cook the steak anyway you like it.

Start boiling water for the vermicelli noodles. Follow package directions, or if they are in Vietnamese, bring the water to a bowl, turn it off and add the noodles. Cook about 3-5 minutes or until tender. Keep in cold water until ready to serve, and then drain them.

Put together the bowls, starting with the noodles, then lettuce, carrots, cucumber and herbs, next the meat, and top with peanuts and the nuoc cham sauce. Enjoy!

IMG_0471 IMG_0472

Other protein subs include fried tofu, chicken, shrimp, or spring rolls. You could also add bean sprouts or other veggies of choice. If you want to get really fancy, dress the salad with spring onion oil and fried red asian shallots. Perfect summer food!

Charquicán (Chilean Dried Beef and Pumpkin Stew)

Charquicán is a word that derives from the Quechua and Mapuche word, charqui, which means jerky. During Andean times, meat and fish would frequently spoil, so they would dry their meat in order to preserve it. The charquicán stew is traditionally made with dried meat and an array of South American vegetables (squash, potatoes, corn) and topped with a fried egg.

Over time, people began to substitute fresh beef (ground or shredded) for the jerky because of the jerky’s strong, sometimes abrasive taste. Which is exactly what I did.

Charquicán

Ingredients:

1 white onion, diced

3 cloves of garlic, minced

1 or 2 lbs of lean beef (You can either use ground beef or thin filets)

3 medium potatoes, peeled and cubed

1 large chunk of pumpkin (called zapallo in Chile, but you can use squash if you like), cubed

2 cups of beef stock

1 hand full of fresh basil, roughly chopped

3 cups of fresh or frozen large kernel corn

1 tablespoon of paprika

1 tablespoon rosemary

3 tablespoon of cumin

3 tablespoons sea salt

pinch of black pepper

1 tablespoon of oregano

2 tablespoons of olive oil

DIRECTIONS:

Cut the beef into strips and simmer in 1/3 c caldo for 1 hour. Shred the beef and save the juices. (If you are using ground beef, skip this step)

Sauté the shredded beef (or ground beef) with the  onion, garlic, pumpkin, potatoes, spices, and salt and pepper in the olive oil in a large, deep pan. Once the beef is cooked and the vegetables nice and fragrant, add the beef stock and simmer until the pumpkin and potatoes are soft (about 20 or 30 minutes). One the potatoes are softening up, mash them up a little to give the stew some thickness, then add the corn and basil and stir. Let the stew simmer for about 10 more minutes until it is nice and thick. Taste for salt or  more spice.

Serve hot in a bowl with a fried egg on top.

Note: Feel free to add more, different vegetables (tomatoes, peas, green beans) and whatever spices feel right. You can’t go wrong with this homey, comforting dish.

This stew is lovely with a free green salad or ensalada chilena and a big glass of Chilean wine.

Another great idea would be to make this a vegetarian stew (use vegetable  or chicken stock and no meat) and serve with a nice juicy steak.

Japchae

Throwback to my time in Korea. You might nee to visit a Korean grocery store to find the noodles but it’s worth it!

Japchae 잡채

INGREDIENTS:

1 red pepper, cut into matchsticks

two medium carrots, cut into matchsticks

1 zuchinni, cut into matchstick

4-5 shitakes mushrooms, cut thinly

3-4 cloves of garlic, minced

1 medium white onion, cut into thin strips

4-5 green onions, diced

1 head of spinach, washed

1 bag of  Korean sweet potato starch noodles called dangmyeon, 당면

Thin strips of beef

soy sauce

sesame oil

1/2 cup fo sugar

black pepper

sesame seeds

DIRECTIONS:

Put a large pot of water on to boil. Sautee the carrots, zucchini, and red pepper in a little sesame oil until pliable, but not overcooked. Set aside.

Boil the sweet potato noodles for about 3 minutes. Do a taste test to make sure they are cooked. Drain the noodles in a strainer, but do not put cold water over the noodles. Put the noodle in a large bowl with some sesame oil. Use the left over hot water to boil the spinach for about 2 minutes. Remove the spinach, and squeeze out the water to create a ball in your hands. Cut the spinach ball into pieces, and add back to the noodles. Next, take scissors and cut the noodles.

DSCN2918

Sautee the onions, garlic, and green onion. Set aside.

Sautee the beef and shitake mushrooms with a little sesame oil and soy sauce. Set aside.

Add all the veggies to your noodles, and the beef, and toss by hand. Add 3-4 tablespoons of soy sauce, and about five tablespoons of sesame oil. Add the sugar, sesame seeds, and black pepper. Toss lightly by hand. Taste for more soy or sugar.

DSCN2919

DSCN2921

And ta-day! Japchae.

DSCN2920

Curry Noodle Soup with Thai Basil

This is a healthy, quick and delicious meal that is great for a rainy day. It´s fast too…only take about 30 or 40 minutes start to finish.

Curry Noodle Soup with Thai Basil

Ingredients:

rice noodles

2 boneless chicken breasts

olive oil

1 14oz can of coconut milk

3 cups of chicken stock

2 tablespoons of curry paste

4 tablespoons of fish sauce

2 limes

Thai basil

cilantro

curry powder

1 bell pepper julienned

1 whole carrot, julienned

1 cup shitake mushrooms

1 cup of spinach (optional)

fresh grated ginger

soy sauce (optional)

Directions:

Get a large cast-iron skillet and set to medium high with a couple tablespoons of olive oil. Add chicken breasts and season with curry powder, salt and pepper. Cook until browned on the outside.

Heat up a medium sized pan and add the thick  and creamy part of the coconut milk and the curry paste. Stir until the curry paste is blended. Add the grated ginger. Add veggies, cooked chicken (cut into bite size pieces), chicken stock, the rest of the coconut milk, fish sauce and lime zest. Juice the limes and add the juice. Bring to a simmer for about 15 minutes. Add the rice noodles and cook for about 5 minutes. Finish by adding the spinach, cilantro and fresh basil. Add soy sauce if needed for extra salt.

IMG_1034

Jambalaya


To liven up the dark Seattle gloom I made a big pot of jambalaya. It tasted awesome so I thought I´d share the recipe which resulted from combining many different ones I found online.

 Shrimp, Sausage and Chicken Jambalaya

INGREDIENTS:

1 boneless skinless chicken breast cut into bite sized pieces

2-3 Hot Italian or Andouille sausages, sliced

1/2 lb peeled and deveined shrimp

3 cups of chicken stock

1 12oz can of diced tomatoes (I like Muir Glen fire roasted)

Holy Trinity: 1 green pepper, two celery stalks, and one onion diced

Creole spices: dried thyme, dried oregano, red pepper, paprika, black pepper, salt

1 can of red beans

1 cup of long grain white rice

butter

1 lemon

2 cloves of garlic, minced

olive oil

DIRECTIONS:

Use a large heavy pot. Sautee the shrimp until golden brown in butter and a pinch of the creole seasoning. Set aside. Add the chicken and sausage and sautee in olive oil and spices, until browned. Remove. Add the holy trinity to the same pot with the garlic and sautee in olive until the onions turn translucent. Add the spices and the meat back into the pot. Add the diced tomatoes and 1 cup of stock and simmer for 40 minutes. Add the cup of rice  with the remaining two cupes of stock and simmer until the rice is fully cooked. Add the beans and stir, and finish with the juice of one lemon.

IMG_0818 IMG_0817 IMG_0819

IMG_0820

Creamy Polenta with Sautéed Mushrooms and Chard and a Poached Egg

Apparently the groundhog saw his shadow….six more weeks of winter it is. Today was particularly chilly, but I´m not complaining–at least there is no ¨polar vortex¨ here in Seattle.

Today I didn´t have work so I decided to cook up something warm and comforting to fight the cold, and what could be more comforting than cheesy polenta? Nothing, that´s what.

My mom has a GREAT recipe for polenta on her cooking show that you can click here—->Polenta with Asiago Cheese

 Creamy Polenta with Sautéed Swiss Chard and Mushrooms with a Poached Egg

Ingredients:

POLENTA:

2 cups chicken stock (sub veg stock for vegetarians)

3 cups of water

1 cup of polenta

salt

butter or olive oil

1 cup of parmesan cheese

black pepper

(I followed the recipe to a T, except I added parmesan, and lots of it, and I did not let it set, and instead served it warm and mushy.)

IMG_0653

SWISS CHARD and MUSHROOMS:

1-2 cups sliced mushrooms (I used crimini)

1 head of red chard, de-stemmed and sliced in ribbons

butter

red wine

herbs (thyme and parsley are nice)

red pepper flakes

salt

pepper

1/4 cup of stock

DIRECTIONS:

Heat the skillet with butter and add the mushrooms. Add herbs, salt, stock, and wine and stir until soft and brown, about 20 minutes. Add black pepper and swiss chard and sauté until soft. If you want a little heat, add a few red pepper flakes.

IMG_0654

POACHED EGG:

Cookus does a good demo here.

Or, this one from Smitten Kitchen is good also.

Delicious meal that is very seasonal for winter. I highly recommend abundant red wine as a ¨side dish¨.

IMG_0655 IMG_0656